

Dryer vent cleaning in Mississauga is essential for maintaining home safety and appliance efficiency. Over time, lint buildup forms inside the dryer vent system. This restricts airflow, forces your dryer to work harder, increases electricity usage, and creates a serious fire hazard.
If your dryer is overheating or taking longer than usual to dry clothes, your dryer vent may be clogged. Regular maintenance prevents these problems and keeps your home safe.
Let’s go step by step in detail.
1. Get Your Gear Together
Before starting, gather all necessary tools so you don’t have to stop midway through the process. A proper dryer vent cleaning kit is especially important because it contains flexible rods and brushes designed to reach deep inside the ductwork.
A vacuum cleaner with a hose attachment will help remove loose lint from tight areas. A screwdriver is required to loosen clamps that secure the vent hose. Gloves protect your hands from sharp metal edges, while a dust mask prevents inhaling lint and dust particles. A flashlight helps you inspect dark areas inside the vent and behind the dryer.
Preparing everything in advance ensures the cleaning process runs smoothly and safely.
2. Disconnect the Dryer from the Wall
Safety is the most important step in dryer duct cleaning. Start by unplugging the dryer from the electrical outlet to prevent electrical shock.
If you have a gas dryer, turn off the gas supply valve before moving the appliance. This step is critical to avoid gas leaks. Once disconnected, gently pull the dryer away from the wall. Move it slowly to prevent damaging the vent hose.
This step gives you access to the rear vent connection and allows safe cleaning.
3. Give the Dryer a Good Vacuum
Lint often collects behind and underneath the dryer. Use your vacuum hose attachment to clean the floor area behind the appliance. Pay special attention to corners and tight spaces where lint tends to accumulate.
Next, clean around the vent opening and the lint trap housing. Even small lint buildup in these areas can reduce airflow and affect dryer performance.
Vacuuming these surrounding areas prevents loose lint from re-entering the vent system after cleaning.
4. Get Your Cleaning Kit in Order
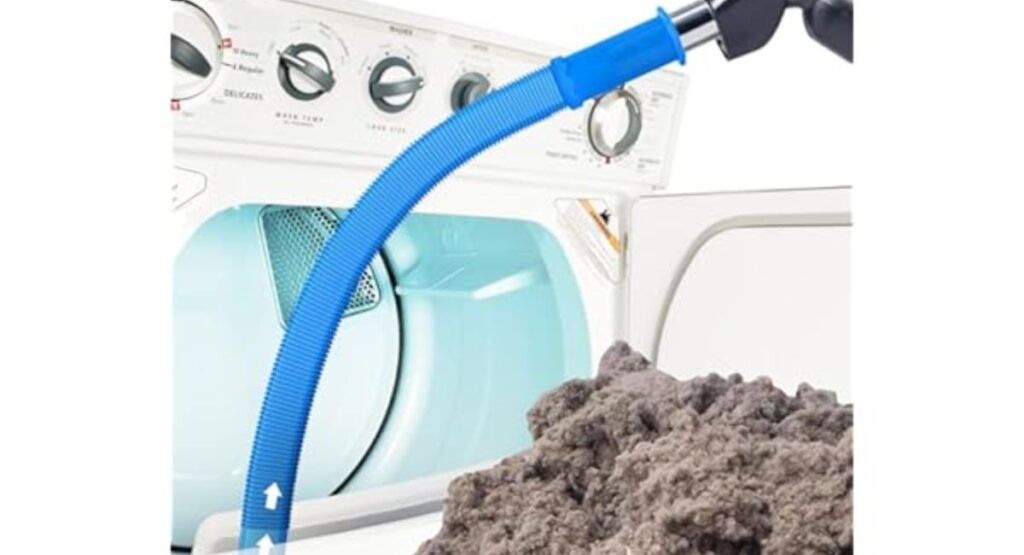
Now focus on the vent hose and duct itself. Start by loosening the clamp that holds the vent hose in place. Carefully detach the hose from the dryer and wall duct.
Insert the flexible dryer vent brush into the hose and rotate it gently while pushing it forward. This motion helps loosen stubborn lint buildup inside the hose. Continue extending the brush deeper into the wall duct to remove hidden debris.
After brushing, use your vacuum to remove all loosened lint particles. For heavily clogged vents, a drill-powered brush attachment can provide deeper cleaning.
Proper cleaning of the hose and duct ensures strong airflow and reduces the risk of overheating.
5. Give the Exterior Vent a Good Looking Over
Go outside your home and locate the exterior dryer vent cover. Inspect it carefully for lint buildup, debris, or any obstruction such as leaves or bird nests.
Remove the vent cover if necessary and clean the inside opening. Make sure the vent flap moves freely and opens fully when air flows through it. If the flap is stuck, airflow will be restricted, causing the dryer to work harder.
A clean exterior vent is essential for proper ventilation and fire prevention.
6. Plug the Dryer Back In
Once everything is cleaned thoroughly, reattach the vent hose securely to both the dryer and wall duct. Tighten the clamp firmly to prevent air leaks.
Carefully move the dryer back into position, making sure the hose is not bent, crushed, or kinked. A damaged or compressed hose can restrict airflow.
Finally, plug the dryer back into the outlet and turn the gas supply back on if applicable.
Proper reconnection ensures safe and efficient operation.
7. Test Out the Vent
After reassembly, test the system. Run the dryer on an air-only cycle for about 10 to 15 minutes.
Go outside and check the airflow coming from the exterior vent. You should feel strong, steady air movement. Also confirm that the vent flap opens fully while the dryer is running.
Strong airflow indicates successful dryer vent cleaning. Weak airflow may suggest a deeper blockage that needs professional attention.
See Also:“Why Clean Windows Change the Entire Atmosphere of a Home”
8. How to Know if Your Dryer Firevent is All Blocked Up
Even after cleaning, you should stay alert for warning signs of a clogged dryer vent.
If clothes take more than one cycle to dry, it usually means airflow is restricted. An overheating dryer or a burning smell during operation is a serious warning sign that should never be ignored.
Excess lint around the lint trap or a vent flap that does not open properly are also clear indicators of blockage.
Ignoring these signs increases fire risk and shortens the lifespan of your appliance. Regular annual cleaning helps prevent these issues.
Final Thoughts
Dryer vent cleaning in Mississauga should be done at least once a year, especially if you use your dryer frequently. Regular maintenance improves energy efficiency, lowers utility bills, and significantly reduces fire hazards.
By following this detailed step-by-step guide, you can protect your home, improve dryer performance, and ensure safe operation all year round.

“As founder of Namezroot, Muhammed Serum blends passion and creativity to bring readers content on names, lifestyle, travel, and more.”